Using Terraform Workspace on AWS for multi-account, multi-environment deployments
Search for a command to run...
No comments yet. Be the first to comment.
Intro When working on a monolith and traffic increases, you might decide to start caching to manage the new volume. If your system is modern or small, you have several caching strategies: Handle the caching logic within the code by integrating somet...
The AWS CLI sync command is a powerful tool for copying new and updated files between a source and destination, with at least one of them being an S3 Bucket. This command can also be used to perform sync between S3 Buckets without the need to transit...

A tutorial using the AWS console
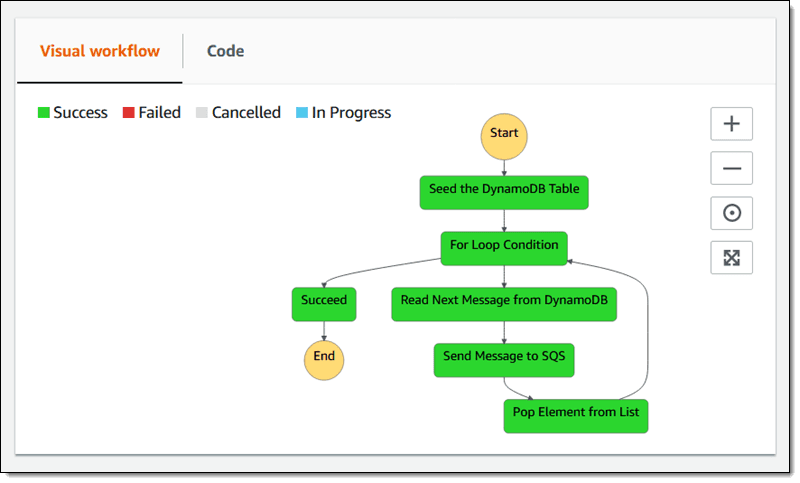
A Step Function Distributed Map and Lambda Demo
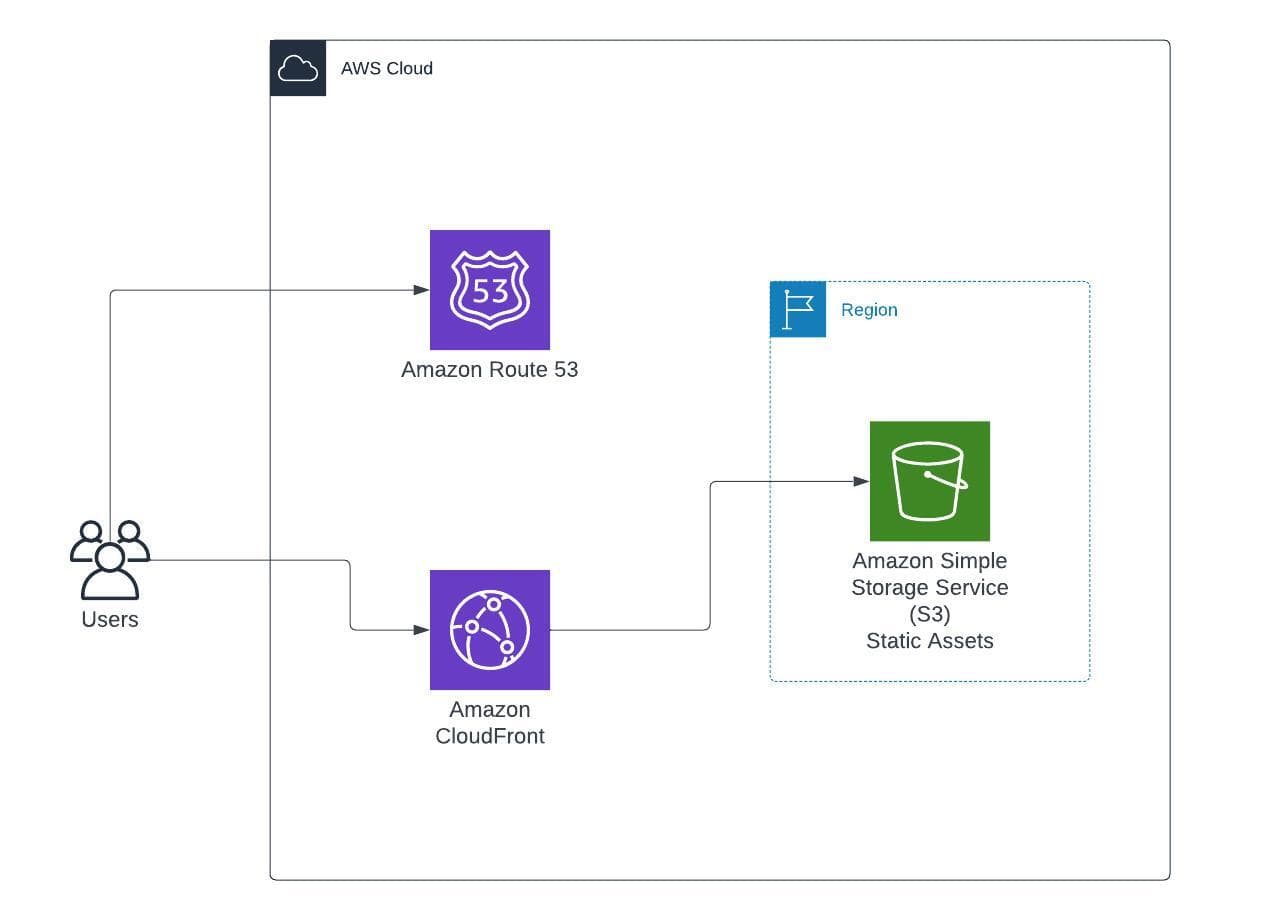
Amazon CloudFront CloudFront is Amazon’s offer for Content Delivery Network. The CDN is composed of a globally distributed set of caching servers that provide low latency and high throughput all around the world. The network is based on more than 300...

Originally posted on 27 May 2020.
Terraform supports two concepts of workspaces: CLI workspace and Terraform Cloud/Enterprise workspace. This article is focused on CLI Workspaces also known as OSS Workspace.
CLI workspaces are a feature that allows us to manage a single Terraform configuration and provision the resulting resources multiple times.
This allows us to have similar groups of resources without managing multiple stacks. To use CLI workspaces, we have to use a compatible backend, like S3.
From this point, I will call CLI Workspaces as workspaces.
Let's imagine a simple infrastructure composed of some virtual machines deployed in three different environments:
Development
Staging
Production
Each one of those three environments is on a dedicated AWS account, and they don't share anything. Configuration files for the environments are the same and must remain consistent and identical.
Differences like the environment tags, instance size, instance number, and other parameters are given with a dedicated variable file tfvars.
We usually have two ways to deploy this configuration multiple times:
different directories
workspaces
This approach guarantees the optimal separation between environments and helps reduce errors, like deploying to the wrong environment.
Having multiple directories also implies that the same code is replicated in all of them, so this is a big downside but can be also an advantage for use cases where heavy customization between environments is required.
In our case, wanting three identical environments, this approach will only be more complex and harder to maintain.
Workspaces are usually my way to resolve this issue and avoid replicated code. Workspaces as a "copy" of the state file that relays on the same terraform configuration files, so you can write once and deploy several times the exact replica of your infrastructure.
When working with workspaces, we manage multiple replicas of the deployed infrastructure from the same configuration file, in a single directory. Working in this single directory can introduce some human errors like the deploy in the wrong environment or destroying the wrong environment.
This is a small example with S3 as a remote backend. This example will be deployed on three different AWS accounts, one for each environment:
dev
stage
prod
Using S3 as our remote backend our Terraform state will be saved on Amazon S3. To maintain all our Terraform states in a single place we choose to use our production account as storage. So we need to create an S3 bucket and a DynamoDB table on our production account, the bucket for this example will be named my-terraform-backend-state. Set up S3 Backend
Before applying the terraform configuration we will have to set up the AWS CLI.
Configuring the AWS CLI
With the AWS CLI installed we can set up our AWS Profile: AWS CLI Named Profiles
~/.aws/credentials
[my-account-dev]
aws_access_key_id=********************
aws_secret_access_key==******************

[my-account-stage]
aws_access_key_id=********************
aws_secret_access_key==******************

[my-account-prod]
aws_access_key_id=********************
aws_secret_access_key==******************
provider "aws" {
  region  = var.aws_region
  profile = "my-account-${terraform.workspace}"
}

terraform {
  required_version = "= 0.15.4"

   required_providers {
    aws = {
      source  = "hashicorp/aws"
      version = "~> 3.0"
    }
  }

  backend "s3" {
    profile              = "my-account-prod"
    bucket               = "my-terraform-backend-state"
    workspace_key_prefix = "eu-west-1/tutorial"
    key                  = "shared-infra"
    region               = "eu-west-1"

    dynamodb_table = "terraform-states-lock-table"
  }
}
This configuration hides a lot of details, so we have to deep dive a little bit into each one.
Profiles are used by the Terraform AWS Provider to authenticate by the use of the named profile we set up early. The complex part here is that we use the profile parameter two times. The first use of profile is inside the provider block, in this case, the parameter is used to deploy the resources we declare in our stack. So if we have to deploy the stack in our development account the profile here must be my-account-dev and by using
profile = "my-account-${terraform.workspace}"
we interpolate our current workspace and in case we are deploying to the development account the workspace name will exactly be dev. So the profile after interpolation will be: my-account-dev, exactly what we need.
The second use of profile is inside the backend block, here we use the parameter to indicate Terraform where our backend (S3 Bucket + DynamoDB Table) will be. In our case, we choose to centralize states and the DynamoDB lock table on the production account so the profile will be my-account-prod.
terraform workspace new dev
terraform workspace select dev
terraform apply -var-file=terraform.dev.tfvars
The example below if deployed to all our three accounts will produce three different state files.
s3://my-terraform-backend-state/eu-west-1/tutorial/dev/shared-infra
s3://my-terraform-backend-state/eu-west-1/tutorial/stage/shared-infra
s3://my-terraform-backend-state/eu-west-1/tutorial/prod/shared-infra
This state file is composed by:
s3://{bucket_name}/{workspace_key_prefix}/{workspace_name}/{key}.json